Christmas Wreath Tutorial
Wall hanging 31" x 31"
You need to have 2/3 yard cream background fabric
1/2 yd red for border
various greens for wreath, scraps really
1/4 yd green plaid for binding
Start by cutting 1 1/2" strips from your green fabric. You need to have 24 - 1 1/2"x 6" strips
and 13 - 1 1/2" x 4" strips. So you won't have to cut very much. Use up your scraps.
Cut your background piece to 21 1/2" square. Find the center of your square and mark it with a water soluble pen.
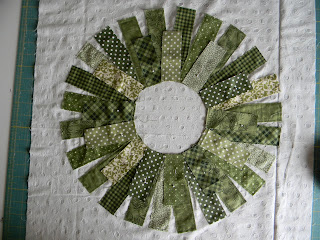
Layout your 6" pieces in a circle as shown. Overlap some pieces randomly. Make sure that you are centered on your background. Once you have the pieces where you want them, pin them in place. Note: If you want, you can use a washable glue stick to tack the pieces down.

Stitch your strips in place sewing 1/8" from the edge. When you wash your wall hanging, the edges will fray a little and give your wreath a softer look.
Now that you have all the larger pieces sewn in place, you now pin in place the 1 1/2" x 4" strips.
Sew your smaller pieces in place. Sewing 1/8" from the raw edge.
Borders. Cut three 5" strips for your red border fabric. Take one strip and cut it into two
5" x 21 1/2", these are for your side borders
Sew on your side borders using 1/4" seam allowance. Press
Measure through the center of your wall hanging and cut your top and bottom border to that length. Sew on the top and bottom borders. Press.
Sew on bunches of red buttons. I used Hill Creek Design Cardinal Red buttons, 1/2"and 5/8"
Quilt as desired. Cut three 2 1/4" strips for your binding. Bind using your favorite method and enjoy your wall hanging.
Happy Holidays!!!


Oh that is cute!!
ReplyDeleteLove this! Really nice, and it looks very doable. Thanks!
ReplyDeleteThank you so much for the great tutorial. What a lovely Christmas gift this would make.
ReplyDelete